Feeds:
Posts
Comments

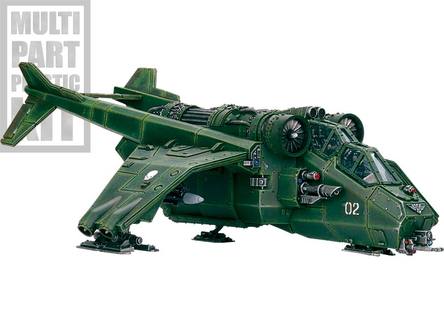
Work-In-Progress: The Shieldmaiden (90% complete)

I’m not a professional or an expert at painting miniatures. I’ve not attended a single class in any sort of Art, short of those from pre-high school. Even so, I have an interest in painting as a hobby, though I rarely have time for proper pieces these days, whether on canvas, paper or miniature. What I do know is learnt by myself, mostly through experimentation and observation of the physical world. Indeed, I’m told that my Art isn’t bad at all. Well, qualified or not, here’s a little painting tutorial that certain people have been bugging me to do for some time… 

Caveat: This is strictly amateur hour. It may be of help to those who are new to painting, but for what it’s worth, it probably won’t turn ordinary people into Golden Demon winners overnight, so don’t expect too much! Also, techniques and terms described here are mostly discovered on my own or coined by me; they may differ from whatever the ‘experts’ recommend or term.

This tutorial has 2 main parts: the first deals with things you need to know to paint NMM; and the second is a step-by-step guide to how I painted The Shieldmaiden’s shield with NMM.

Introduction to Non-Metallic (NMM) Painting

This is a technique of painting in which non-metallic paints are used to achieve a metal effect in miniature painting. It is essentially painting 2-D artwork onto a 3-D object (ie the miniature) to simulate a metal appearance.

Some pointers before we start, just to debunk widely-held concerns regarding NMM:

1. NMM is too hard; it’s for experts only! Actually, understanding a few simple principles is all you need to produce a reasonably good NMM effect. You don’t need years of painting experience before attempting NMM!

2. NMM is too time-consuming! Not at all, if you know what you’re doing. There isn’t much fine detail painting involved, compared to say, doing an elaborate banner. And you only use a few colours, usually just for shading of the base colour!

3. I can’t do it; my hands are too big! That’s just an excuse. Seen any tiny Golden Demon winners lately? The brush used is the same size, whether your hands are big or small! Probably easier if they are bigger, in fact!

The Most Important Step: Planning

Before you set paint to miniature, you must plan how your NMM 2D artwork  will look on the miniature. This is the single MOST IMPORTANT STEP in the entire process. If you planned it wrongly, your finished miniature won’t look right. And normally, whatever you mentally envisioned in your original planning will NOT be exceeded by the actual work produced; it will often fall short. By how much depends on painting skill. So it’s essential that you make the best possible plan from the onset.

It’s actually not hard. Just follow these simple guidelines:

Light Source(s) Determine where light will be falling on your miniature. There may be several sources, but if you’re a first-timer, have only one major light source from above slightly to the side, and one minor source elsewhere. Shading and highlight will follow the light… of course.

Earth-Sky Delineation If the surface is large enough, the pre-dominant feature will be what I like to call the ‘Earth-Sky Delineation’. This is the commonly seen effect on polished metal surfaces, for example, the dark line in the gold of the ‘White Dwarf’ lettering below:


Preview/Sample purposes only, no appropriation of IP intended

Depending on your primary light source, draw the ‘Earth-Sky’ partition.  The line should be at where direct light as you envision just can’t reach (ie from that point onwards, it hits at an angle instead of directly); if the surface is curved, follow the curve. The line should be a little ‘bumpy’, not too straight or uniform, or it’ll look unnnatural.

Shading and Highlight If there is an Earth-Sky Delineation, the part nearer the light source (ie ‘Sky’) should be brightest from the line and getting darker as it moves NEARER the light, ie upwards if light is coming from above (see ‘White Dwarf’ example above). The other half (ie ‘Earth’) should be dark at the line and going slightly lighter as it goes down. However, the edges should be highlighted, especially nearest the light source, and less at the opposite edge from that.

Reflection Absent from the ‘White Dwarf’ example is the presense of ‘Reflection’. This greatly enhances the believability of the NMM, which is essentially a forced optical illusion. What this means is that you are painting in some artwork that simulates a reflection. For example, if your NMM surface is close to a prominent green object, there should be a corresponding warped green image in the NMM surface. This is by no means a must-do, but this separates the little leaguers from the Big Boys. You should do this if the metal is to look highly polished, and especially if the surface is large. 

Light Globes/Trail Put in Sprinklings of light globes / trails (follow the curve of the miniature) to enhance the overall ‘reflective’ nature of metal. This is just a simple highlight in the form of bright coloured dots or soft lines, strategically placed on the NMM artwork. For instance, look at the shining star on the ‘F’ in the White Dwarf example above.

Now that you have a mental image, sketch with pencil and paper an approximation of how the NMM artwork should look like on the miniature, so that you can follow this when you actually paint. As you work, you may improvise beyond the original plan when appropriate. Inspiration sometimes strikes only at the very end!

Here’s a the simple sketch that I did for the helm of The Shieldmaiden shown at the beginning of this post:

As can be seen, planning NMM need not be complicated!

Painting Tips

What kind of paints are available? There 2 main types, when it comes to miniatures. The first is the ready-to-paint-from-the-bottle type. Citadel Paints are of this type. The paint is watery, and you can paint directly from the bottle after wetting your brush. Even the bottle, with its flip cap and mini-dish, is designed to facilitate this. The downside is that mixing and blending is not easy, because acryllics dry quickly, and the paint is too watery to use a wet palette effectively. A wet palette is a surface that has a wet sponge underneath, from which moisture is continually fed to the paint deposited on the palette, to prevent it from drying up.

The second type is the paste or semi -paste type. Vallejo Paints are of this type. You squeeze some out on a wet palette to facilitate easy mixing and blending. The downside is that you will not have the speed of painting straight from the bottle when applying solid unmixed colours and perhaps, when glazing. But you have greater control over the hue and tone of your colours.

In NMM painting, both blending and glazing are important, and used in tandem for the smoothest finish. Blending is a method of transitioning from one colour or pitch/tone to another by incrementally mixing one paint into another and painting the gradual change at each stage of mix. Glazing is the method of painting semi-transparent (ie watered-down) layers of paint onto an existing coloured surface. The gradual build-up of ‘glazes’ also result in a transition of one colour or pitch/tone to another.

Both types of paint can be used for NMM, with advantages and disadvantages as noted above. For newbys however, it may be advisable to use the paint-from-bottle type, for ease of use. As you’ll see in the step-by-step guide, if you have the right colours, no advanced techniques are required to achieve a reasonably good NMM effect!

Colour Palettes. Here are the paints you should have to do NMM for the 2 common metals in miniature painting (in Citadel Paint colours):

For Gold: Chaos Black, Calthan Brown, Snakebite Leather, Sunburst Yellow, Bleached Bone, Skull White and Optional – Dark Flesh, Leviathan Purple

For Silver: Chaos Black, Codex Grey, Fortress Grey, Skull White and Optional – Regal Blue, Snakebite Leather

Some tips on general painting:

Extreme Contrast For best results, your darkest parts should be pitch black and your brightest parts should be pure white, regardless of what the base colour for your NMM is. Blend/glaze your base colour to black or white to achieve ultra high contrast typical of metals. 

Line Definition Define objects in your painting by painting edges with a highlight and a dark line next to each other, in order to make it pop out.

Shield of the Shieldmaiden, NMM Example, Step-By-Step Guide

This Guide is made with the newby in mind. Only Citadel Paints were used, to be applied from the bottle, with only a bit of watering down of paint for simple glazes, or dragging of the brush accross waste paper (to skim excess paint and sharpen brush point) required. You do not need a wet palette, or any advance techniques to complete. Remember to load your brush with a little water before dipping into the paint bottle!

After I had sketched a simple drawing of the NMM plan, I began by undercoating with Chaos Black.

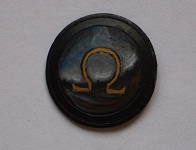
I then painted the NMM part with solid Codex Grey. The Omega motif was then painted on in Chaos Black.

Next I drew the Earth-Sky line with tiny bumps (as discussed in the first section of this post) and shaded in the the dark tones by applying simple glazes of watered down Chaos Black. A good way to ensure a smooth finish is to apply only thin watered down paint that is almost dry on the brush; make repeated applications to build up pigment slowly, so that you can observe the gradual darkenning and control its strength. Glazing with black is considered easy, because black is the all dominant colour that can eclipse all other colours.

I then painted in the base colour of the Omega Motif (Iyanden Darksun). I used a founddation paint so that I only needed to make a single pass. Notice that I left a black outline showing – this helps to bring out the Omega icon from the ‘silver’ background, which would otherwise look a little ‘drab’.  I also tightened the shading of the background a bit.

The light tones were added. First I layered on some Fortress Grey near the ‘sky’ side of the Earth -Sky line, and then just a little Skull White as highlight. I also painted on a headless triangle of Fortress Grey at the top, showing the direction of the light source. As  reflection, I washed a bit of watered down Regal blue over the top left corner, as reflection of the blue sky. For the bottom, I used Bestial Brown as reflected ground.

I strengthened the shading and highlights for the background. For the Omega icon, I used Snakebite Leather and watered down black to shade, and bleached bone to highlight. A thin white line was drawn at the light junctures to contrast with the black outline.

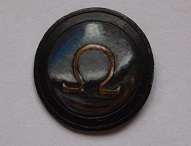
More touching -up, and soft light trails were added to the top left corner and also around the outer edged of the NMM part of the shield. Some Snakebite Leather was added to parts of the Bestial Brown, and twirly black outlines were drawn around them. The non-metallic part of the shield were painted on.

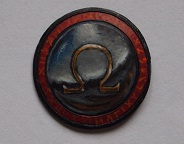
And the final look of the NMM shield, with Omega icon…

It took me just an hour to do this shield, including taking pics (this post took far longer!). I did it through breakfast this morning, before going off to the office! Which means that NMM isn’t hard and doesn’t really take very long to do!

The helmet was painted NMM gold, and the sword was polished silver…

I’ve yet to complete the model to my own satisfaction. Some more touch-up is required. Once I’m done, I’ll post The Shieldmaiden with proper pics as her own entry in the Archangels Army Gallery.

Haven’t done anything for my Archangels army for a very very long time. So, here’s the Executioness, which looks to me like a female version of Frank Frazzetta’s Death Dealer. A very cool mini from Kabuki Models. I’ve painted her in typical ‘Black Legion’ colours, though not consciously. Speed painted her in one night. Not too shabby, if I say so myself.

I think she’ll make an excellent counts-as-Kharn.

Why do players lament the lack of melta in the new Grey Knights? I seriously don’t understand this. Is it because they think that the Knights can’t deal effectively with Armour 14? I think these people haven’t thought this through properly.

Let’s analyse in more depth. The basic Troop unit for the Knights is the Strike Squad. They may take Psycannons. These days, that means Assault 2/Heavy 4 Range 24 S7 AP4 Rending… MUCH improved from the previous incarnation.  Statistically, that’s BETTER than a meltagun, in terms of rate of fire (even on the move) and range with around the same chance of glancing / penetrating AV14 (about 0.48 for meltagun IF WITHIN 6 inches and 0.44 for psycannon FROM UP TO 24 inches away). Yes, AP1 means that meltaguns may just pip psycannons in obtaining a ‘destroy’ result on average, but psycannons are far more likely to actually damage, as you can have them shooting from farther away over more turns. A full Strike Squad can have TWO psycannons, each cost the SAME as a meltagun. The equivalent Tactical squad can have only ONE meltagun. The Sergeant may have a one-shot combi-melta. Clearly, Strike Squads are better off when shooting at AV14.

In addition to that, you can arm the Justicar with a Daemonhammer, and then you can go HAMMERTIME against tanks! Casting Hammerhand increases the Justicar’s assault Strength to 10! That’s definitely better than a Tatctical Squad Sergeant’s S8 Fist or Hammer (which are 15-20 points more expensive!)! And the Daemonhammer can be Mastercrafted for 5 points!

Which means…. collectively, the humble Strike Squad is as good if not better than an ordinary melta toting marine equivalent for tank hunting!

What’s more, Purifiers, Paladins and Purgation Squads can take up to FOUR psycannons; indeed virtually every unit in the book can have psycannons, so quit worrying about lack of melta!

(If people are worried that S7 AP4 can’t ignore Feel No Pain and /or instant kill marines… please be reminded that psycannons are RENDING and shoot up to 4 times more per turn! It’s better than melta in almost everyway, trust me!)

Right. The new Grey Knights codex been out 2 weeks. Panicked doomsayers of the net are screaming ‘cheese’ and predicting the end of the world as we know it. OK, it’s an improvement over the old codex, but it’s my firm opinion that Grey Knights are only an upper middle tier army. Space Wolves, IG, and possibly Dark Eldar and Blood Angels remain top tier (in that order), after working out my mathhammer and overall army assessment (which could be the subject of an entire post on its own!).

This post is concerned only about the Grey Knights’ nemesis: Daemons. My first post about the new Grey Knights was met with some criticism regarding my assessment of Grey Knights vs Daemons. Look, I’m not saying the Knights don’t have an advantage over Daemons; all I’m saying is that the advantage is less now compared with the old codex. For example, in the old codex, ‘ordinary’ Knights had 2 base attacks (Stormbolter True Grit) during assault and usually needed a 3+ to hit (WS5), a 2+ to wound (S6) and the Daemons get a 5+ save. Now, the Knights have 1 base attack, need a 4+ to hit (WS4), a 4+ to wound (S4) and the Daemons still get 5+ save (2+ if having Blessing of the Blood God, which was not applicable for the old codex!). In what Universe would the latter be an improvement over the former?

Having said that, there is no denying that the new Knights still have an advantage over Daemons. All of them have preferred enemy against Daemons, their psycannons are now S7 AP4 Assault 2 / Heavy 4 Rending and are EVERYWHERE, Psybolt ammunition improve bolt weapons by +1 Strength, the Dreadknight is designed to kill Greater Daemons or Daemon Princes and has Dark Excommunication, their Warp Quake limits the Daemons’ deep striking, all their weapons are Daemonbane, etc…

So then, what can Daemons do to mitigate their disadvantage? What’s the appropriate response to their nemesis?

Let’s look at some options, shall we? In the HQ, we have Skarbrand, the Exiled One. This Bloodthirster grants preferred enemy to everyone within 24 inches, including the enemy. But since the Knights already have that, you lose nothing, but gain preferred enemy for most if not all of your army. The downside: He’s a Bloodthirster that CAN’T FLY (?!?), though he can Fleet. Also, he doesn’t have the Blessing of the Blood God (but he still has a 4+ invul that neither Dark Excommunication nor the Vindicare can remove!). He’ll kill a Dreadknight unscathed on the charge, by the law of averages, though. Not bad, especially if you take into account his multiplier effect on the rest of the army. A little pricey, however.

An ordinary Bloodthirster is also good. Give him Flight, Blessing (2+ invul in assault and vs psychic powers) and/or Might for S8 (S9 on the charge).

The other Greater Daemons can be fielded but you won’t be getting any extra advantage over GK.

Side note: You don’t have to worry about fielding Tzeentch Daemons because GK psychic defence is useless against Daemons – they never roll for their powers; in fact they are not even listed as being psychic!

Heralds. If you want to shoot up GK and their transports, Tzeentch Heralds are probably the best answer. Put them in Chariots so that they have 5 Wounds each and can zip around the battlefield as jetbikes). Give them Bolt (S8 AP1) and Breath (auto glance). The default Gaze is also deadly to GKs (Breath is too). Make them Masters so that they can shoot twice a turn. All for 130 points each? Yes, please. You can take up to 4, that’s 20 wounds with 4+ saves and a lot of mid-range firepower. Sadly, that is also the band range that GKs excel in.

If you’re really worried about Dreadknights, you may take Skulltaker. His ‘Skulls for the Skull Throne’ is not a Daemonic Gift and so cannot be removed by Dark Excommunication. He’ll instant kill the Dreadknight on a to wound roll of 4+ if it’s not saved (5+ only for the Dreadknight). Skulltaker on Juggernaut has 6 attacks hitting on 3s (re-rolling if Skarbarand is around) on the charge and strikes first. There is little chance that the Dreadknight will survive. You can join him with Bloodcrushers to make him more survivable against other threats. Downside: He moves as infantry and has no shooting (don’t be fooled by the mini weilding a flaming skull – he doesn’t have Death Strike).

ELITES I’ve always considered Fiends of Slaanesh as the best choice for Elites, not Bloodcrushers, because:

1. They’re cheaper

2. They’re faster (beasts)

3. Have offensive and defensive grenades

4. Have 2 more attacks than Bloodcrushers each to take advantage of Rending

5. Superior Initiative (so that the grenades are useful) that really shine against marines

With GKs, there is a slight problem. Halberds are I6, so they’ll strike first. Fortunately, ordinary GKs only have 1 attack at S4, and Halberds are expensive… the Fiends will do OK, you can have far more of them for the same points.

Some people swear by Flamers of Tzeentch, and they’re good because of Breath, but at 35 points a pop, with just 1 Wound, I don’t see them consistently surviving against S5 stormbolters and psycannons before they can get into template range to fire off their Breath…

TROOPS You probably don’t want Plaguebearers, which are the staple Troop choice for most Daemon armies. Their Feel No Pain doesn’t work in assault and GKs can increase their Strength to 5 with Hammerhand… so, better not. If you want shooty, Pink Horrors are not a bad choice. They aren’t as good against GK compared to non-marines, but they have 4+ saves, which means their T3 is not a complete disaster. Their great advantage is that you can start dealing damage upon arrival from deep strike, instead of waiting one turn to charge… and 4+ invul means they’re already in cover anywhere you land!

You may want to leave your assault to the Fiends (supra) instead of Bloodletters or Daemonettes in the Troop choices. It’s a matter of preference. But be reminded that Bloodletters or Daemonettes move only as infantry. Getting to assault will not be easy.

FAST ATTACK The easy choice is Flesh Hounds. They have Blessing and a reasonable number of attacks, move as beasts, and are cheap. GKs will really struggle against them in assault. They can act as tarpits as well.

HEAVY SUPPORT Soul Grinder or Daemon Prince? Both are useful. The Prince can be given Blessing, if you want a close combat monster. But either Tzeentch Prince or Soul Grinder are probably better choices because they also give you shooting.

Some afternotes:

Although Blessing of the Blood God seems overwhelmingly good against GK, there’s still a downside, Khorne Daemons have little to no shooting, which means you’ll be just sitting there to be shot at and/or assaulted before you get to do anything after appearing. So deep strike behind cover to improve your normal save from shooting to 4+!

Daemons arrive by Deep Strike in stages. This is a problem, as they’ll be picked off with GKs scary mid-range firepower. If you arrive too far, your shooting can’t touch them and it’ll take you a long time to assault, while getting shot up. If you come too close, they’ll shoot you up mercilessly. It’s a conundrum. Try to ensure there’s proper terrain on the table, or it’ll be a monumental uphill task instead of a difficult one.

So that’s my take on Daemons trying to survive against Grey Knights. It’ll be a different army from the balanced, all-comers list (bar GK), but against an army designed to kill it, this may be the only way to avoid annihilation!

So, I had the pleasure of playing in the Kindred doubles tourney last weekend with my partner-in-crime Mr IG player [names have been changed to protect the guilty :)]. 28 teams gathered at the Battlefront HQ (ie the Flames of War people) to duke it out; 1500 points per team (750 per player), battlepoints format with some innovative missions that included ‘free’ scoring units of ‘Expendables’. Great fun all in all, and kudos to the great people organising and sponsoring the event (you all know who you are).

I played my Blood Angels with Mephy, Librarian Dread, Priest and 2 squads of Assault marines in Rhinos. My partner had 2 Russes, 1 Demolisher, Chimera with Command Squad and Troops. Why such a combo, you ask? I already warned my partner that we were going to get our Ss handed to us, but he really liked my converted Libby Dread and wanted it in the game. Sergeant Bygone and his ‘mastercrafted’ (ie handpainted) powerfist and combat shield (who in the world plays with one?!) also made an appearance based solely on looks. And then there was… well you get the idea. My partner argued (rightly) that we were there just to have fun, not beat face, so we might as well field some cool minis.

We did quite badly gaming-wise, but had a blast of a time (even clinching 2 awards somehow…). We drew the tournament winners from last year for the first game, and got absolutely clobbered. They were awesome dudes though, so we didn’t feel bad about it at all. Indeed, I think they tried to help us a little with some sound advice when it looked like we might get TAed, which we managed to avoid. They went on to get the award for killing the most enemy units in the tourney (massacre or TA in ALL their games). They played Blood Angels (Death Company in Land Raider) and Tyranids (Tervigon build).

In game two, we drew IG and Blood Angels [seems to be a lot of the latter in this tourney, more than even Space Wolves! BTW, best general was the Space Wolves player 😦 Every dem tourney, it seems…] They had 2 Stormravens and 3 Vendettas for FIVE FLYING GUNSHIPS (!!!) loaded with guys totting melta, MANTICORE and a Libby to Shield everything. And they went first (!!!). They alpha struck our Ss firing every dem thing including EIGHT Bloodstrike missiles, fistfuls of lascannons, meltas and assault cannons plus the Manticore barrage… but to no avail, they destroyed NOTHING except stun and took off some weapons. Indeed, the Manticore hit their own Assault Marines after they deep struck next turn, trying to melta our Russ’ back (that didn’t work either). With some luck, we did OK against them, even taking down 3 of the flyers in 2 of our turns (we only had 3 turns for this game (and we didn’t get ours), because of insufficient time). Our ‘Expendables’, which were supposed to take the virtually undefended enemy objective didn’t even show up.


‘Expendables’

In our third game, we drew the eventual overall tournament winners, another Blood Angels and Tyranids. They didn’t get best general, but they got the best army award (took the trouble to convert and paint up fluff matching ‘Expendables’ and did a comprehensive write up why Blood Andgels are fighting with Tyranids(Starcraft theme marines controlling the Zerg, ahem, I mean Hive Tyrant, with a halo-like device). Nice work people, very very nice!). That gave them the boost to take overall winners. We also gave them best sportsmanship for the opponents we faced, though our luck was atrocious for this game. They were that nice!

Congratulations, James & Zaki!

We ended up in the bottom half of the tourney but didn’t feel left out because they handed out awards to us… ‘UN Peace Keepers’ for getting the least Killpoints but not the worst in battlepoints, and also the ‘Live Free and Die Hard’ award, for surviving I guess?

(Funnily enough, my partner really was a ‘UN peacekeeper’, when he served a tour with the US marines, back in the day)

For painting-related awards, the resident painter Carl took most of them. I know him, and he’s good. His expendables were easily the best painted, and his Bloodthirster is to die for!

What else can I say about the event? It was well-managed in that there were only 2 guys (Khairul & Arzmi) doing most of the actual organising (they had to, among other things, carry 14+ tables and chairs between floors and set up terrain, which alone showed their commitment). The venue was generously loaned out by the Flames of War head honcho Jeff, and lunch (pizza) was sponsored by local GW distributor Alvin.

We really really really enjoyed ourselves. Thanks, guys!

The biggest wargaming event for 2011, Adepticon shows the state of Warhammer 40k armies. The top three most popular armies entering the tourney were:

1. Space Wolves
2. Blood Angels
3. Imperial Guard

More instructive it seems is that out of 40 requests to use ‘count as’ armies, a whopping 38 were for Space Wolves!!! That suggests that people aren’t really interested in Space Wolves fluff , but perceive their codex as the most powerful codex currently available.

And, it seemes to me, further worsenning the stigma of playing with the Wolves. If you win, it’s because of your ‘overpowered’ codex. But if you LOSE…

So you probably won’t see many people playing ‘fun’ games with the Wolves (sad), but the tourney scene is always a good indicator of general sentiment. Right now, Space Wolves is the uber army/count-as army of 40k.

Will they still be king post Grey Knights? We’ll see.

Ok. So I have like 3 Stormravens waiting to be painted. Problem is, in what colours?

I’ve had the physical Grey Knights Codex for a week (yes, I know it’s before the official launch), and there are things I want to try out. One of them is the Stormraven. It’s actually slightly different from the Blood Angels version:-

1. It costs 5 points more.
2. It has Fortitude, a psychic power that allows it to ignore shaken and stun damage results.
3. Instead of Bloodstrike Missiles, it has Mindstrike Missiles, which are Range 72′, Str 4 AP5 Heavy 1, Blast, One Shot missiles that cause Psi-shock (Psykers hit also suffer Perils of the Warp).

Not bad. But is it possible for me to paint one in such a way that it could be passed off as either Grey Knights or Blood Angels? How would such a colour scheme look? Because if it can be done nicely, I’ll paint the rest of the Grey Knights army in the same scheme. Yeah, I already have the new plastics: 2 boxes of GK Terminators, 1 box power armour GK and the Dread Knight. Sigh. So much unpainted stuff and I’m STILL buying?

Something to ponder over the weekend, I guess…

I’ve liked the metal Grey Knight Terminators for some time, and have wanted to do a super elite (read: low model count, since I also paint ‘super’ slow) army of them for some time. This was further cemented with the Stormraven being rumoured to be available for both Grey Knights and my bread-&-butter Blood Angels. I could paint up Ravens in ambigous Grey Knight or Blood Angels colours with detach-able iconography and use them for both armies!

And so I looked through the upcoming Grey Knights codex rumours on the net for the past months with great interest. With many of us having seen a preview copy of the new codex by now, here are my personal thoughts on the army rules:-

This army is very very VERY good against marines. Every grey knight and his pet servo skull has a force weapon that ignores armour saves. All the psycannons are higher strength, faster-firing AND rending now too, and they are EVERYWHERE in this army. Many squads, not just Purgation squads, can have like 4 Psycannons firing 16 S7 rending shots per round. Their stormbolters can be made strength 5 too. I think GKs have a distinct advantage against every 3+ save army out there, which on top of not really benefitting from their high armour saves against GK, are also limited in number like GK.

Grey Knights are good against most OTHER armies as well. Hordes are still manageable in close combat because of nifty things like Cleansing Flame that basically allow Purifier squads to wipe half of ALL enemies in assault BEFORE anyone gets to strike (since most hordes have bad saves). Blobs of 50 guardsmen or 30-boy ork squads? No problemo. 1 squad will take care of them in 2 assault rounds, statistically speaking.

The handicap of no dedicated transports for their Troops has been taken care of. Grey Knights now have jump infantry, Stormravens for fast redeployment and also teleport capabilities, including a last minute shunt up to 30 inches to grab objectives built into certain infantry types (no transport needed). So they are, on top of all other buffs, FAST now, as compared to the old codex.

Their Grandmasters can grant D3 squads ‘scoring’, ‘counter-attack’ USR, ‘scout’, or re-roll all 1s to wounds for basically no extra cost, as far as I can tell (compared with C:SM).

Also, their overall points cost, despite considerable increase in effective abilities like force weapons, psyker powers on all units, have gone down.

Yes, Grey Knights are a force to reckoned with, if played right. Ther small numbers only belie their considerable advantage against most other armies. In my humble opinion, at least.

All right then, with that out of the way, lets move on to… My beef with the new codex. The way the rules are writ makes no sense vis-a-vis the fluff. Here’s why I think so: There is an overall improvement in army prowess versus every army out there… EXCEPT THE ONE IT’S SUPPOSED TO BE FIGHTING AGAINST. So why are all these ‘improvements’ put in? They are only really good against NON-DEMONS!!!!!!!!

Let’s quickly go through the game-changing uber things they’ve put in – Force Weapons. These ignore armour saves, which make them very gawdem good against marines (who are supposed to be their allies), BUT NO BLOODY GOOD against Demons who have INVULNERABLE SAVES!!!! In fact they’ve REMOVED all the GK’s abilities to ignore Invulnerable Saves, present in the old codex. OK. the Vindicare Assassin has Shield Breaker. But he’s not a Knight, and he’s one guy who can shoot ONE model a turn. He’s going do nuts against an ENTIRE army of invulnerable saves!

Psyker powers up the wazzoo. Yeah, big help that would be against IMMUNE Khorne units. Force Weapon instant death don’t work either, thank you very much.

Greater speed. Hmm, don’t demons move and assault immediately after deep strike, thereby tying up your GKs? So the vaunted Knights don’t even get to shoot before being dealt hellblade death? Oh, Strike Squads have Warp Quake? So what, Demons can’t appear just outside range, and THEN assault to own your ass? And oh, some demons are IMMUNE. Besides, if you play ONLY with Strike Squads, you’re asking to have your ass handed to you.

All that Rending shooting. Er, demons have invulnerable saves, not armour saves. And they DON’T HAVE ANY TRANSPORTS to be shot down.

My dissatisfaction is not that Demons can be made extremely effective against Grey Knights if you put your mind to it, after all, Demons are probably the weakest army out there, but that the Grey Knights codex changes have made them good against all OTHER armies they’re NOT supposed to be fighting but are NOT EFFECTIVE against the army that they ARE supposed to be fighting. It makes no sense. It seems that GW just wanted to make GKs exciting for selling stuff (by making them scary to the most prevalent army out there – marines!) than making GK improvements make sense.

Ah well, just my 2 cents.

Further to my article Stormraven General Tactica (Blood Angels) Part 1 couple of days back, here’s Part 2.

Blockade! Alright, you could decide to Reserve your forces if your opponent is going first (maybe do a Sudden Strike! on him)… but guess what? So can your opponent, if you’re going first! He may in fact Reserve everything! You will therefore find it hard to Lightning Assault! on turn 1… or is it?

Depending on your opponent’s army composition, you could answer this by way of Blockade! This is the tactic of zooming your Ravens and vehicles to your opponent’s table edge over the first 2 (unopposed) turns, and COMPLETELY blocking off any means he has of bringing his forces onto the table!

Yes, you read right. You can do this. When a Reserved unit becomes available, it MUST be deployed, otherwise it is LOST (ie destroyed). Just like any unit going out of the table, eg falling back or forced out. (Mishap only applies to deepstriking). You could utterly annihilate your opponent’s army if he Reserved everything. Seriously.

Obviously, not all armies are susceptible. If your opponent army has no Deepstriking or Infiltrating units, and what he has can’t fly, and ESPECIALLY if he’s all mech-ed up (which is quite common), then he’s done for.

How? Well, if you’re playing with Ravens and a combination of other vehicles (like what’s being covered by this article), then they have the range (being FAST or have a large body, like the Land Raider) to reach the opponent’s table edge in 2 turns and place themselves such that they cover the entire table edge with <5 inches between them (4 from the side edges of the table)… This is because standard tables usually aren’t EXACTLY 6 feet, they fall 2-3 inches short, and you can cover 69 inches with 3 Ravens and the Dreadnoughts they carry (for example). Each Raven is 9.5 inches long, each Dreadnought has a base of 2.5 inches, and no enemies can come closer than 1 inch to any of them. The narrowest enemy tank is 3 inches. There’s no way a fully mech-ed up army will be able to move onto the table if you placed 3 Ravens and 3 Dreadnoughts correctly. And the enemy cannot successfully ram themselves onto the table (0 movement, so the highest strength is 5 if having armour 14 and a tank), insufficient to penetrate even armour 12.

If the table is slightly longer than that, you can create a single gap of several inches where his forces have no choice but to funnel through. Place the 3 infantry units that were carried by the Ravens onto the gap, blocking it. Now, only by Tank Shock-ing can any vehicle enter the table. Ideally, all your infantry should be armed with melta. Place at least 1 melta-toting marine from each of the 3 units close together in the gap right at the edge of the table. When he tries to tank shock, you have 3 chances to succeed your leadership test and probably 3 chances to Death or Glory successfully. Believe me, the chances of success is high. He’ll lose most of his army trying to get through, which means he’s probably lost even if he does.

Note that even if some of your opponent’s units can deepstrike or infiltrate, but he decided to put them in a transport during Reserving, they CANNOT come out of their transport and deploy by deepstrike or infiltration. They MUST deploy by coming in with their transport from the table edge… unless he’s Blood Angels and his transport Deepstrikes! 🙂

If you have only 2 Ravens, you can still have a Raider or fast Rhino chasis vehicle substitue for the 3rd Raven, but they would have to be placed in the forward position at deployment, in order to reach where they need to be, by turn 2.

If he’s not completely mech-ed up, use your infantry to plug holes along the table edges to prevent enemy infantry from coming in. Remember that they still cannot come within 1 inch of your forces. The only exception is during the Assault phase, but the enemy has to come in during Movement, so those units would be ‘lost’ when they can’t.

This tactic is possible only with Ravens because:-
1. They ignore intervening difficult, dangerous and impassable terrain
2. They carry Dreadnoughts to help with the crucial extra inches
3. They also carry infantry to plug holes and threaten melta
4. They are frigging 9.5 inches long
5. They move frigging up to 24 inches

If the opponent has 1 or 2 Deepstrike or Infiltrate units, this tactic is still good, unless those units are ridiculous anti-tank, with like 5 melta. Anything else, he would likely lose when Reserving everything. Diagnostic: In Killpoints, he must come close to destroy your forces, which are all along his table edge, concentrated. He’ll likely be destroyed by the combined fire from all your vehicles and the 3 infantry units assaulting BEFORE he can destroy 1 of your vehicles and let the rest of his forces come in from the table edge. In Objectives missions, he may decide to drop one near an objective. On turn 1, move your Ravens towards Blockade! but Skies of Blood your 3 infantry units on objectives to intercept the lone enemy unit, or if there’s more than 2 objectives, wait out till the end and zoom the Ravens with troops to claim 2 objectives as a Last Minute Grab to win.

Important Note: You should tell an opponent with a susceptible army about this tactic when he says he’s Reserving everything or close to everything, after you roll to go first. Although it might be interesting to read, it’s probably not interesting to play, for all parties involved. Once he knows, there are few people who would risk losing most of his army on the small chance that he would get extremely lucky, and somehow break through the Blockade! without losing the game.

Essentially, the existence of this tactic limits the opponent’s options in that he must deploy a sizeable chunk of his forces on the table in the beginning, so that you can do a Lightning Assault! on him whenever you get to go first. He can’t Reserve everything or close to everything, and not reasonably expect to be trounced.

Wow, that was another long post. Next post: Part 3.

In view of the spanking new Stormraven kit released by GW recently, it’s perhaps inevitable that I would return for another scrutiny of the Stormraven’s place in the game, tactics-wise.

This Tactica is meant for Blood Angels. Grey Knights are expected to get the Stormraven in their upcoming Codex, and indeed I may collect an army of them, but at this point in time, I’m (obviously) not privy to insider information regarding that Codex, and so have no way of forming an informed opinion regarding its use for Grey Knights.

I’m not some tournament-winning super gamer who can be considered an expert in matters 40k, but for what it’s worth, I’ve come up with the following Stormraven Tactica:-

Value-For-Money? In all honesty, purely looking at the unit entry, it’s not easy to justify it’s 200+ point cost. The Valkyrie, also a fast skimmer with an impressive array of guns and its own version of Skies of Blood and only slightly inferior armour and passenger capacity, is HALF the cost of the Stormraven.

The Wave Serpent of the Eldar is even cheaper than the Valkyrie, and is arguably more resilient than the Stormraven. Plus, with Star Engines, it can be made even faster. TWELVE whole inches faster, to be exact.

What neither of those comparisons have is this: Assault Vehicle rule. So the question then becomes: Is that rule and a little upgrade in the guns / armour department worth something in the region of a 100 points? Depends on how you’re going to use those Ravens, I say!

(I don’t consider Ceramite Plating to be an important factor in this discussion because being HUGELY visible and having armour 12 means that even missile launchers (very common and numerous these days) will easily blow the Raven apart; so is the extra d6 armour penetration on the melta (still Strength 8!) such a big deal? If you had Ceramite on a Land Raider, now THAT would be phenomenal, but not on the puny Raven)

It should be noted that, with the Stormraven, a Space Marine (S4 T4 3+ save) army is given the option of a Fast Skimmer Transport for the very first time. Tactically, this changes how the army can be played. The value of the Stormraven, then, lies in the tactical options it opens for the army, which is an ‘external’ consideration, and not on its inherent value on a point-for-point comparison with equivalent units (eg Valkyrie and Wave Serpent) in the game.

Strengths & Weaknesses As you analyse the strengths and weaknesses of the Stormraven, you will begin to realise that utilising any of its strengths also brings about weakness. For example: If you want to use the Assault Vehicle to unload your embarked ‘assaulty’ units on the enemy, you can only move the Raven 12 inches. Which means that, though you can shoot some of your weapons, you lose the Obscured protection that comes with moving faster (there’s no smoke launchers on the Raven). And you would be CLOSE to the enemy in order to get the Charge in, exposing the Raven to assault, shooting and yes, even MELTA (which everyone and their mothers seem to have, in abundance!). Only an idiot thinks he can rely on Ceramite Plating when the hull is made of cardboard. Unfortunately, the Stormraven is not a 35-point Rhino the loss of which can be easily shrugged off – it is a significant point investment, and you WILL feel the pain if it goes down.
On the other hand, if you choose to move flat-out all the time and stay far away from the enemy, you only get to shoot once per turn with the Power of the Machine Spirit, and you can’t use Assault Vehicle. You can still do Skies of Blood, but is all these worth 200+ points? Obviously not.
If you use the Stormraven purely as a gunship, and granted, the armaments are impressive, you might as well field Predators, Devastators or other units that can deliver far more punch for their points than the Stormraven, which has a large part of its cost sunk into transport and the Assault Vehicle rule, that you’re simply NOT utilising. But even staying in cover (not easy to do with a big model) and relatively static all the time in order to make full use of all the Stormraven’s guns is no guarantee the enemy won’t blow it up anyway. At 200+ points, won’t you rather have a Predator with better armour, for way cheaper?
All that means that you can’t really have it all when it comes to the Stormraven. Clearly, you have to play a very tactical game in order to make good use of something so expensive, ie flexibly flowing from one function to another function as and when it’s advantageous, following the dictates of scenario, enemy composition and tactics, terrain and environment.
In addition, fielding the Stormraven means that you will need to invest even more points on quality units to be transported inside, and will probably have to build your army around it. This limits your options and increases your predictability for an experienced opponent, and can be considered yet another disadvantage.
With so many limitations, how then can this beautiful model be used in a game of 40k, without having your @ss handed to you each and every time?

Sudden Strike! Unlike a Land Raider, the Stormraven can’t take even a moderate beating. And it’s arguably even harder to hide. So, in a situation where you’re not going first in a game, your opponent has a lot of big guns that can touch you, and there is hardly any cover on your deployment zone, it might be prudent to put the Raven(s) in Reserve. This way, it doesn’t get shot at before it can do anything. The obvious downside is that you have little control over when it actually arrives (Descent of Angels doesn’t apply here), and there is a danger of your forces arriving piecemeal, thereby getting easily picked off from concentrated enemy attention. You can alleviate this by having most of your army come in by Descent of Angels, so that you can time their arrival better to coincide with the Raven’s. The best way though, is to make sure that the Raven’s arrival is so devastating that the enemy return fire / assault is crippled, and does negligible damage before the rest of your forces come onto the table.

You are usually at a disadvantage when you move second. But by fielding Stormravens, you can Reserve and have your forces come in strongly and swiftly from your table edge.

When the Raven becomes available, your approach should depend on whether there are any enemy units within range of an assault, ie can your Raven move 12 inches from your table edge, disembark passengers and have them charging the enemy? That usually means whether there are any enemies on your side of the table, as the charge range is easily 20 inches to 29 inches (with Fleet and good rolls) from your table edge. I call assaulting out of the Stormraven manouvre ‘Raven Rush’ (TM), which also involve shooting at 2 different units with the Raven in addition to assault. I elaborate more on the Raven Rush in the Lightning Assault! section further on. For now, it is simply getting in the charge after moving 12 inches with the Raven.

If you can Raven Rush, priority should be given to positions from which you can consolidate (after victory) into a ‘safe’ spot (ie hidden or has cover), as opposed to an open area, where your opponent may have been trying to bait you with a throw-away unit. Charging multiple units may also be a good idea, depending on your forces, where you can allocate attacks just so that they remain locked in combat and finish off the enemy on the enemy’s turn, just in time for you to move them again on your turn! Hopefully, to charge into another unit!

If there are no enemies in range… Deepstriking is usually not a good idea as there’s a chance of mishap, scattering badly, and on top of that, you don’t get an Obscured save. Far better just to move flat out from a table edge, fire one weapon, and remain Obscured. This is still better than not Reserving in the first place, and deploying to be shot at without an Obscured save, and not getting off a shot before the enemy. Who knows? Maybe you’ll get lucky with the one shot, and reduce what he can bring to bear on your Obscured Stormraven. In any case, fly towards a ‘good’ target for assault, and follow-up for a charge on the next turn.

One thing you can do after moving flat-out is Skies of Blood. If you loaded up on shooty units, they can deepstrike in this manner. Note that having a Locator Beacon helps. You’ll also give the enemy more targets to shoot at, diluting the effectiveness of his attacks. The problem is getting suitable units to carry on the Raven. Dreadnoughts with good shooty are Heavy choices, meaning that they are competing with Ravens themselves for slots. Good shooty infantry that can fire well on the move would be… Sternguard? But obviously Codex Space Marines does it better with drop pods, Pedro Kantor (makes them scoring and is quite shooty and defensive with fist) and Lysander (Bolter Drill + makes the squad hard to be taken by enemy walkers). Using the Stormraven to deploy Sternguard is just a waste of points. It’s far better to carry assaulty units on the Stormraven instead!

The beauty of Reserving with Stormravens is that your enemy doesn’t get to shoot, effect, or assault anything before the Ravens first fire off a salvo and/or assault with whatever they are carrying. It’s a Sudden Strike! out of nowhere!

Lightning Assault! This is not to be confused by the Apocalypse Datasheet of the same name. This tactic is very suitable if you’re going first. Deploy in a forward position, in anticipation of the Raven Rush (TM). Pray that your opponent doesn’t Seize. You can reduce risk by having a psyker with Shield of Sanguinius at the centre of your forces, just in case an unlikely Seize happens. More likely, you get to go first. The Raven zooms 12 inches toward its prey, shooting 2 high strength weapons and its hurricane bolters (if any), and dislodge its deadly cargo of assault-ers…

Here, I should note that it’s possible for Blood Angels to get Fleet assault-ers in the form of Mephiston and Death Company Dreadnoughts. If you load this combination on a Raven, it now has an AVERAGE charge range of 24-26 inches (max 29 inches)! [Math: 12 inches Raven move, 2 inches disembark, 1-3 inches diametre of model base, 3.5 inches average run, 6 inches charge]

If you’ve deployed correctly (ie way in FRONT), there’s basically nowhere the enemy can hide from you on a standard 6X4 table, and you can get a 1st round assault easily.

Yes, you can also do this with a Land Raider, but the Stormraven is better for this because:-
1. It’s cheaper than the Land Raider
2. It ignores intervening difficult and impasssable terrain (flying)
3. It carries an accompanying Dreadnought, for added punch!
4. It shoots TWO high strength weapons, at up to 2 DIFFERENT targets, AND all defensive weapons after moving 12 inches

With any luck, you can down TWO transports with the Power of the Machine Spirit (possible as Stormraven guns are twin-linked and high strength), forcing their occupants to become vulnerable to assault in the same turn. As the Raven carries 2 distinct units, it can charge both, even if they are far apart, as long as both are within the 360° charge radius of the Raven. With Fleet, that’s a lot of leeway (about 10-17 inches).

The effectiveness of the Rush is improved if you have more than one Raven, obviously. A combination of Land Raiders and Stormravens is also good.

Side Note: Raven Rushing Mephiston is better than Mephiston by himself, even though he can fly 12 inches himself, because:-
1. No need to rely on psyker power to get to the enemy. A lot of armies have psy-defense, and there’s also a chance of Perils
2. Extra 3 inches gained from disembarking the Raven + size of Mephiston’s base
3. Protected by transport’s hull against nasty powers and shooting, before assaulting (enemy may get first turn, or Seize)
4. Raven cracks enemy transports and/or softens enemy with shooting before the charge
5. Accompanied by Dreadnought (usually can’t fly, and those who can, don’t have Fleet). There are things out there that even Mephiston can’t handle on his own!

Once you’ve shot up the enemy and the assault-ers are out, your opponent will have a lot more to worry about and have a harder time shooting down your Ravens, so their survivability should improve despite the absense of 4+ Obscured save!

Raven Rage Control You probably want the Death Company Dread for the Fleet, but this means that ordinary Death Company must also be fielded. Both Death Company and the Death Company Dreadnought have the Rage USR, which as of the 5th Edition Codex, cannot be cured by the presense of a Chaplain. Ravens can perform a Rage control function. And they can do it better than normal transports because they have a large body, move up to 12 inches, and can fly over difficult and impassable terrain AS WELL AS OVER the Death Company / Dreadnought to park at a convenient (or ‘safe’) spot for embarkation. Be aware that you can’t move flat out and still embark. After the compulsory Rage move, fly the Raven within 2 inches of the Death Company / Dreadnought, and they can all embark into the Raven for transport towards your intended enemy unit(s) next turn.

Raven Butt This is a manouvre in which you ram an enemy as hard as you can. Do this in a non-Annihilation mission if the Raven has no more working weapons and the transport function is not needed anymore. You can do a Strength 10 attack if you moved 24 FULL inches. It’s actually at a disadvantage because of low armour and the fact that IT”S NOT A TANK. So don’t treat it as if it were a Wave Serpent, and expect results! Do it only if there’s no better choice. The Raven may not survive.

Last Minute Grab This is the tactic beloved of Eldar. At the 5th or 6th turn zoom the Raven (preferably with a scoring unit) up to 24 inches to an objective and SIT ON TOP OF IT. Even if they destroy the vehicle, the scoring unit would still disembark onto the objective. Sadly, the Raven IS NOT A TANK, so you can’t do the cheesy Eldar Tank Shock out of the blue to force an Enemy scoring infantry unit already on an objective out of the way, and rely on Energy Fields (max Strength 8 and no extra D6 armour penetration) to withstand Death Or Glory! Sitting on the objective with the Raven would prevent the Eldar from Tank Shocking your own scoring unit away though! And as a skimmer, the Eldar would find it hard to ram the Raven as well! WIN!

Blood Saturation You should field more than one Stormraven or have other transport tanks (such as Land Raiders) to saturate vehicle targeting for your opponent. This makes your Ravens much more survivable, and you have Rush redundancy in case some transports go down. It would not be a good idea to have only one Raven and no other vehicles, because your opponent will most likely channel all available firepower at it to bring it down. It doesn’t really help the rest of your army because people usually have a mix of anti-tank and anti infantry guns. All the anti-tank will go to the Raven and THE SAME AMOUNT OF anti-infantry will target the rest of your army. So you’re not really drawing fire AWAY from the rest of your army! Either have sufficient vehicles or NONE AT ALL (ie all-jump Blood Angels, also For The Win!)

Modelling and Hiding If you read the 5th Edition 40k rules properly, you realise that as a skimmer, you have to take the Stormraven off its stand and SET IT ON THE TABLE after it finished its move. This means that you can legally obscure the Raven with your other vehicles, like the Land Raider (easily), another Raven (obviously), or even with the Rhino (harder). You can also choose to retract the landing gears of the Stormraven kit to give it a lower profile, thereby making it easier to obscure / hide. If you play 3 Ravens, the centre one can carry a Librarian or Librarian Dreadnought with the Shield of Sanguinius power, which can give all three a 5+ cover save from any angle. And they can all fly together, at any speed, and still get a 5+ save regardless of terrain.

Next up: Stormraven General Tactica Part 2, covering Options and Load-outs, supporting units to take, things to watch out for, and the conclusion!